Mình đang tạo một web bán hàng cần bổ sung thêm trường nhà sản xuất, tìm hiểu trên mạng để làm thành công. Mình viết bài chia sẻ lại như sau:
Thực hiện xong bài viết này bạn hoàn toàn có thể thêm bất cứ trường gì đó vào mọi loại sản phẩn của Woocommerce.
Để thêm trường vào sản phẩm chúng ta sử dụng woocommerce API chèn vào functions.php trong folder theme của bạn.
Mình sẽ thêm custom fields vào tab đầu tiên general tab, về sau các bạn sẽ tìm hiểu cách thêm fields vào tab khác có sẵn khác hoặc thêm tab mới.
WooCommerce Hooks
Cách sử lý cũng giống như bạn làm việc với custom fields trong wordpress với User, chúng ta sử dụng 2 hooks. Thêm action cho hook woocommerce_product_options_general_product_data, hàm liên kết với hook này sẽ hiển thị trường mới. Hook thứ hai, dùng để lưu giá trị của trường woocommerce_process_product_meta.
// Display Fields
add_action( 'woocommerce_product_options_general_product_data', 'woo_add_custom_general_fields' );

// Save Fields
add_action( 'woocommerce_process_product_meta', 'woo_add_custom_general_fields_save' );
Đoạn code trên, là 2 actions callback cho 2 hook có tác dụng tạo mới và hiển thị fields, cuối cùng lưu giá trị fields sử lý bởi hàm hook woocommerce_process_product_meta. Đầu tiên, là hàm tạo fields có nội dung như sau.
function woo_add_custom_general_fields() {

  global $woocommerce, $post;

  echo '<div class="options_group">';

  // Custom fields will be created here...

  echo '</div>';

}
Để tạo các fields, chúng ta sử dụng tính năng xây dựng form fields có sẵn cung cấp bởi woocommerce api. Tất cả những api này bạn có thể tìm thấy trong file “WooCommerce/Admin/WritePanels/writepanels-init.php”.
- woocommerce_wp_text_input()
- woocommerce_wp_textarea_input()
- woocommerce_wp_select()
- woocommerce_wp_checkbox()
- woocommerce_wp_hidden_input()
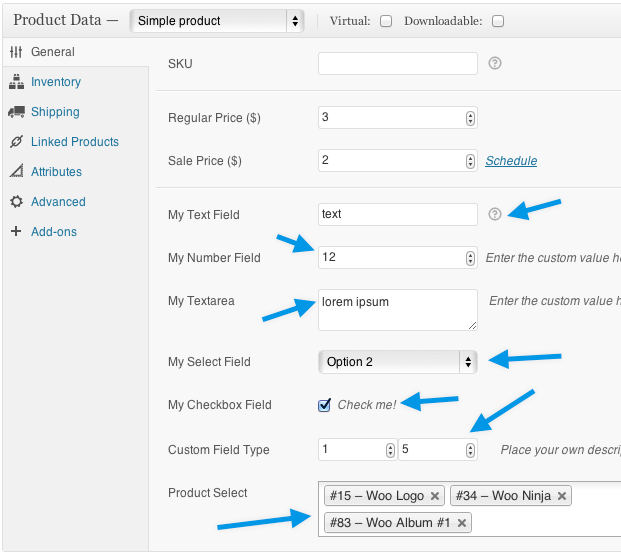
Một số dạng Field mẫu:
Text Field Type
Phổ biến nhất là text field, thêm code sau nếu bạn tạo field nhập văn bản như họ tên, SĐT..
// Text Field
woocommerce_wp_text_input(
    array(
        'id'          => '_text_field',
        'label'       => __( 'My Text Field', 'woocommerce' ),
        'placeholder' => 'http://',
        'desc_tip'    => 'true',
        'description' => __( 'Enter the custom value here.', 'woocommerce' )
    )
);
Ví dụ: thêm text field vào nội dung tab general.
function woo_add_custom_general_fields() {

  global $woocommerce, $post;

  echo '<div class="options_group">';

      // Text Field
    woocommerce_wp_text_input(
        array(
            'id'          => '_text_field',
            'label'       => __( 'My Text Field', 'woocommerce' ),
            'placeholder' => 'http://',
            'desc_tip'    => 'true',
            'description' => __( 'Enter the custom value here.', 'woocommerce' )
        )
    );

  echo '</div>';

}
Lưu ý: tham số 'desc_tip'=>'true' dùng hiển thị tooltip thay vì hiển thị mô tả ra ngoài bên dưới field, sẽ có biểu tượng hướng dẫn cách dùng cho field đó thông qua tooltip.

description là nội dung của tooltip, nếu desc_tip=true hoặc mặc định desc_tip=false là mô tả field thông thường. Tính năng tooltip có thể áp dụng cho mọi kiểu field.
Trường hợp bạn muốn thêm nhiều Text Field bạn có thể sử dụng trực tiếp hàm:
if ( !function_exists( 'woocommerce_wp_text_input' ) ) {
    require_once WP_PLUGIN_DIR. '/woocommerce/includes/admin/wc-meta-box-functions.php';
}
// Text Field
woocommerce_wp_text_input(
array(
    'id' => '_text_field',
    'label' => __( 'My Text Field', 'woocommerce' ),
    'placeholder' => 'My Text Field',
    'desc_tip' => 'true',
    'description' => __( 'Enter the custom value here.', 'woocommerce' )
)
);
Tham khảo thêm ví dụ:
//Thêm trường nhập giá wholesale vào trang chỉnh sửa sản phẩm
add_action( 'woocommerce_product_options_pricing', 'ict_woocommerce_product_options_pricing' );
function ict_woocommerce_product_options_pricing()
{
    woocommerce_wp_text_input( array(
        'id' => '_wholesale_price',
        'class' => 'wc_input_wholesale_price short',
        'label' => __( 'Wholesale Price', 'woocommerce' ) . ' ('.get_woocommerce_currency_symbol().')',
        'type' => 'text'
    ));
}
//save new price
add_action( 'woocommerce_process_product_meta_simple', 'ict_woocommerce_process_product_meta_simple', 10, 1 );
function ict_woocommerce_process_product_meta_simple( $product_id )
{
    if( isset($_POST['_wholesale_price']) && $_POST['_wholesale_price'] > 0 )
        update_post_meta( $product_id, '_wholesale_price', $_POST['_wholesale_price'] );
}
Number Field Type
Để tạo Number Field, bạn sẽ dùng đến code này:
// Number Field
woocommerce_wp_text_input(
    array(
        'id'                => '_number_field',
        'label'             => __( 'My Number Field', 'woocommerce' ),
        'placeholder'       => '',
        'description'       => __( 'Enter the custom value here.', 'woocommerce' ),
        'type'              => 'number',
        'custom_attributes' => array(
                'step'  => 'any',
                'min'   => '0'
            )
    )
);
Number Field và Input text sử dụng chung thẻ < input, nên thiết kế chọn vào hàm woocommerce_wp_text_input chỉ khác tham số ‘type’, với kiểu input muốn tạo. Loại field dạng nhập số thì thiết lập type=>’number’. Bạn có thể thiết lập các thuộc tính khác cho kiểu field này ví dụ bước nhảy số (step), giá trị min, giá trị max.
Ở code trên, mặc định step=1 và thiết lập số nhỏ nhất bắt đầu từ 0. Lưu ý: min, max là số tự nhiên.
Textarea Field Type
Tạo Textarea bằng code dưới đây:
// Textarea
woocommerce_wp_textarea_input(
    array(
        'id'          => '_textarea',
        'label'       => __( 'My Textarea', 'woocommerce' ),
        'placeholder' => '',
        'description' => __( 'Enter the custom value here.', 'woocommerce' )
    )
);
Cũng đơn giản như input text với hàm woocommerce_wp_text_input.
Bạn có thể tùy biến hiển thị form field, bằng cách thêm thành phần HTML hoặc sửa thuộc tính class..nếu không muốn dùng hàm woocommerce_wp_textarea_input bạn sẽ cần định nghĩa hàm tạo textarea mới.
Ví dụ:
function _woocommerce_wp_textarea_input( $field ) {
    global $thepostid, $post;

    if ( ! $thepostid ) $thepostid = $post->ID;
    if ( ! isset( $field['placeholder'] ) ) $field['placeholder'] = '';
    if ( ! isset( $field['class'] ) ) $field['class'] = 'short';
    if ( ! isset( $field['value'] ) ) $field['value'] = get_post_meta( $thepostid, $field['id'], true );

    echo '<p class="form-field ' . $field['id'] . '_field"><label style="display:block;" for="' . $field['id'] . '">' . $field['label'] . '</label><textarea class="' . $field['class'] . '" name="' . $field['id'] . '" id="' . $field['id'] . '" placeholder="' . $field['placeholder'] . '" rows="2" cols="20"' . (isset( $field['style'] ) ? ' style="' . $field['style'] . '"' : '') . '>' . esc_textarea( $field['value'] ) . '</textarea> ';

    if ( isset( $field['description'] ) && $field['description'] ) {
        echo '<span class="description">' . $field['description'] . '</span>';
    }

    echo '</p>';
}
Dropdown Select Field Type
Dropdown field thì phức tạp hơn xíu, bạn phải nhập dữ liệu options.
// Select
woocommerce_wp_select(
array(
    'id'      => '_select',
    'label'   => __( 'My Select Field', 'woocommerce' ),
    'options' => array(
        'one'   => __( 'Option 1', 'woocommerce' ),
        'two'   => __( 'Option 2', 'woocommerce' ),
        'three' => __( 'Option 3', 'woocommerce' )
        )
    )
);
Nhập danh sách lựa chọn bởi mảng dữ liệu vào tham số ‘options’.
Checkbox Field Type
Code sau đây sử dụng tạo field checkbox.
// Checkbox
woocommerce_wp_checkbox(
array(
    'id'            => '_checkbox',
    'wrapper_class' => 'show_if_simple',
    'label'         => __('My Checkbox Field', 'woocommerce' ),
    'description'   => __( 'Check me!', 'woocommerce' )
    )
);
Hidden Field Type
Với hidden field thì khá đơn giản chỉ cần id và value.
// Hidden field
woocommerce_wp_hidden_input(
array(
    'id'    => '_hidden_field',
    'value' => 'hidden_value'
    )
);
Products Select Field Type
Ngoài, những field thông dụng của form, bạn có thể tạo các fields đặc trưng riêng cho woocommerce. Đoạn code sau đây sẽ tạo trường lựa chọn sản phẩm.
// Product Select
?>
<p class="form-field product_field_type">
<label for="product_field_type"><?php _e( 'Product Select', 'woocommerce' ); ?></label>
<select id="product_field_type" name="product_field_type[]" class="ajax_chosen_select_products" multiple="multiple" data-placeholder="<?php _e( 'Search for a product…', 'woocommerce' ); ?>">
    <?php
        $product_field_type_ids = get_post_meta( $post->ID, '_product_field_type_ids', true );
        $product_ids = ! empty( $product_field_type_ids ) ? array_map( 'absint',  $product_field_type_ids ) : null;
        if ( $product_ids ) {
            foreach ( $product_ids as $product_id ) {

                $product      = get_product( $product_id );
                $product_name = woocommerce_get_formatted_product_name( $product );

                echo '<option value="' . esc_attr( $product_id ) . '" selected="selected">' . esc_html( $product_name ) . '</option>';
            }
        }
    ?>
</select> <img class="help_tip" data-tip='<?php _e( 'Your description here', 'woocommerce' ) ?>' src="<?php echo $woocommerce->plugin_url(); ?>/assets/images/help.png" height="16" width="16" />
</p>
<?php

Custom Field Type
Bên cạnh đó,bạn còn có thể tạo custom field tự định nghĩa riêng, nhờ vào cách lưu đa dạng dữ liệu trong wordpress bởi hàm update_post_meta. Với post meta wordpress hỗ trợ lưu kiểu chuỗi, số, boolean, thậm trí mảng. Trường hợp lưu giá trị là đối tượng vd mảng wordpress sử dụng hàm php serialize dùng để mã hóa đối tượng và giải mã ngược lại bởi hàm unserialize.
Ví dụ sau đây, tôi tạo 2 Number fields lưu giá trị của chúng vào mảng chung với danh nghĩa là một field.
// Custom field Type
?>
<p class="form-field custom_field_type">
    <label for="custom_field_type"><?php echo __( 'Custom Field Type', 'woocommerce' ); ?></label>
    <span class="wrap">
        <?php $custom_field_type = get_post_meta( $post->ID, '_custom_field_type', true ); ?>
        <input placeholder="<?php _e( 'Field One', 'woocommerce' ); ?>" class="" type="number" name="_field_one" value="<?php echo $custom_field_type[0]; ?>" step="any" min="0" style="width: 80px;" />
        <input placeholder="<?php _e( 'Field Two', 'woocommerce' ); ?>" type="number" name="_field_two" value="<?php echo $custom_field_type[1]; ?>" step="any" min="0" style="width: 80px;" />
    </span>
    <span class="description"><?php _e( 'Place your own description here!', 'woocommerce' ); ?></span>
</p>
<?php
Bạn có thể làm mọi thứ trong việc thiết kế custom field, như thêm CSS làm đẹp field.
Lưu giá trị Fields
Chúng ta đã tạo xong fields và hiển thị trong tab general, tiếp đến công đoạn lưu giá trị fields mới này cho sản phẩm hiện tại đang ở cửa sổ chỉnh sửa thông tin sản phẩm. Giá trị của fields sẽ lưu lại khi nhấn vào nút update hoặc Publish. Như trước đó bạn biết, chúng ta sẽ sử dụng hàm woo_add_custom_general_fields_save liên kết vào hook woocommerce_process_product_meta. Nguyên lý rất đơn giản, hàm sẽ kiểm tra sự tồn tại giá trị của field trong dữ liệu form POST, nếu field có giá trị chúng ta sẽ tạo post meta sử dụng update_post_meta(). Chú ý để lưu dữ liệu an toàn, chúng ta sử dụng thêm esc_attr() và esc_html()
Đoạn code sau đây là ví dụ cách lưu mỗi kiểu field.
<?php
function woo_add_custom_general_fields_save( $post_id ){

    // Text Field
    $woocommerce_text_field = $_POST['_text_field'];
    if( !empty( $woocommerce_text_field ) )
        update_post_meta( $post_id, '_text_field', esc_attr( $woocommerce_text_field ) );

    // Number Field
    $woocommerce_number_field = $_POST['_number_field'];
    if( !empty( $woocommerce_number_field ) )
        update_post_meta( $post_id, '_number_field', esc_attr( $woocommerce_number_field ) );

    // Textarea
    $woocommerce_textarea = $_POST['_textarea'];
    if( !empty( $woocommerce_textarea ) )
        update_post_meta( $post_id, '_textarea', esc_html( $woocommerce_textarea ) );

    // Select
    $woocommerce_select = $_POST['_select'];
    if( !empty( $woocommerce_select ) )
        update_post_meta( $post_id, '_select', esc_attr( $woocommerce_select ) );

    // Checkbox
    $woocommerce_checkbox = isset( $_POST['_checkbox'] ) ? 'yes' : 'no';
    update_post_meta( $post_id, '_checkbox', $woocommerce_checkbox );

    // Custom Field
    $custom_field_type =  array( esc_attr( $_POST['_field_one'] ), esc_attr( $_POST['_field_two'] ) );
    update_post_meta( $post_id, '_custom_field_type', $custom_field_type );

    // Hidden Field
    $woocommerce_hidden_field = $_POST['_hidden_field'];
    if( !empty( $woocommerce_hidden_field ) )
        update_post_meta( $post_id, '_hidden_field', esc_attr( $woocommerce_hidden_field ) );

    // Product Field Type
    $product_field_type =  $_POST['product_field_type'];
    update_post_meta( $post_id, '_product_field_type_ids', $product_field_type );

}
?>
Kết quả:
Hiển thị dữ liệu custom field cho sản phẩm
Chúng ta vừa hoàn tất tạo fields và lưu giá trị fields cho mỗi sản phẩm. Những dữ liệu này sẽ được hiển thị trên frontend trong woocommerce custom template của bạn. Ở bài học trước mình viết khá đầy đủ cách tùy biến giao diện và tính năng với woocommerce thông qua sử dụng filters hooks và override Woocommerce default fields.
Để lấy thông tin custom field, chúng ta sử dụng hàm get_post_meta(). Xác định product ID và tên field cần lấy.
<?php
// Display Custom Field Value
echo get_post_meta( $post->ID, 'my-field-slug', true );

// You can also use
echo get_post_meta( get_the_ID(), 'my-field-slug', true );
?>
Tham số thứ là giá trị thuộc tính ‘id’ của tham số mảng khởi tạo field bởi các hàm tạo fields trong woocomerce. VD: woocommerce_wp_checkbox, woocommerce_wp_select, woocommerce_wp_text_input..
Bạn có thể override template woocommerce/templates/content-single-product vào theme. Chèn thêm dòng này vào sau đoạn thực thi action do_action( 'woocommerce_single_product_summary' );
echo get_post_meta( get_the_ID(), '_text_field', true );
View trang sản phẩm sẽ thấy ngay kết quả, hiển thị thêm chuỗi là giá trị của field ‘_text_field’.
Tạo tabs mới
Cuối cùng code snippet sau đây giúp bạn tạo thêm tabs sản phẩm:
add_action( 'woocommerce_product_write_panel_tabs', 'woo_add_custom_admin_product_tab' );

function woo_add_custom_admin_product_tab() {
    ?>
    <li class="custom_tab"><a href="#custom_tab_data"><?php _e('My Custom Tab', 'woocommerce'); ?></a></li>
    <?php
}
Kết quả:

Tab có biểu tượng mặc định như hình trên, tuy nhiên bạn có thể trang trí tab bằng cách thêm CSS, ví dụ thay icon cho tab.
Nếu nếu muốn thêm fields vào trong những tab khác ngoài general tab, bạn chỉ việc sửa lại tên hook của hàm liên kết woo_add_custom_general_fields cho đúng tab bạn cần. Ví dụ: sử dụng hook woocommerce_product_options_shipping để thêm fields vào shipping tab. Mọi thông tin hooks xem tại woocommerce/admin/post-types/writepanels/writepanel-product_data.php
Thêm fields vào custom tab
Hiện tại tab chưa có fields nào, chúng ta sử dụng hook woocommerce_product_write_panels để hiển thị các fields cho các custom tab mới thêm. Thêm hàm liên kết vào hook woocommerce_product_write_panels, mọi fields được phân phối vào các custom tabs chúng ta sẽ sử lý tại callback này. Với mỗi tab xác định bởi một ID bao bởi thẻ DIV.
/**
 * Adds the panel to the Product Data postbox in the product interface
 */
public function product_write_panel() {
    global $post;
    // the product

    if ( defined( 'WOOCOMMERCE_VERSION' ) && version_compare( WOOCOMMERCE_VERSION, '2.1', '<' ) ) {
        ?>
        <style type="text/css">
            #woocommerce-product-data ul.product_data_tabs li.product_tabs_lite_tab a { padding:5px 5px 5px 28px;background-repeat:no-repeat;background-position:5px 7px; }
        </style>
        <?php
    }

    // pull the custom tab data out of the database
    $tab_data = maybe_unserialize( get_post_meta( $post->ID, 'frs_woo_product_tabs', true ) );

    if ( empty( $tab_data ) ) {
        $tab_data[] = array( 'title' => '', 'content' => '' );
    }

    foreach ( $tab_data as $tab ) {
        // display the custom tab panel
        echo '<div id="custom_tab_data" class="panel wc-metaboxes-wrapper woocommerce_options_panel">';
        woocommerce_wp_text_input( array( 'id' => '_wc_custom_product_tabs_lite_tab_title', 'label' => __( 'Tab Title', self::TEXT_DOMAIN ), 'description' => __( 'Required for tab to be visible', self::TEXT_DOMAIN ), 'value' => $tab['title'] ) );
        woocommerce_wp_textarea_input( array( 'id' => '_wc_custom_product_tabs_lite_tab_content', 'label' => __( 'Content', self::TEXT_DOMAIN ), 'placeholder' => __( 'HTML and text to display.', self::TEXT_DOMAIN ), 'value' => $tab['content'], 'style' => 'width:70%;height:21.5em;' ) );
        echo '</div>';
    }
}
Lưu giá trị fields trên tab
Nếu bạn tạo nhiều tab, chúng ta nên ghi nhớ tên fields theo tab và có thể lưu toàn bộ dữ liệu của fields phân loại vào các custom tabs vào mảng 2 chiều và update_post_meta cho dễ quản lý.
public function generate_tabId($tab_title){
    $tab_id = '';
    if ( $tab_title ) {
        if ( strlen( $tab_title ) != strlen( utf8_encode( $tab_title ) ) ) {
            // can't have titles with utf8 characters as it breaks the tab-switching javascript
            $tab_id = "tab-custom";
        } else {
            // convert the tab title into an id string
            $tab_id = strtolower( $tab_title );
            $tab_id = preg_replace( "/[^\w\s]/", '', $tab_id );
            // remove non-alphas, numbers, underscores or whitespace
            $tab_id = preg_replace( "/_+/", ' ', $tab_id );
            // replace all underscores with single spaces
            $tab_id = preg_replace( "/\s+/", '-', $tab_id );
            // replace all multiple spaces with single dashes
            $tab_id = 'tab-' . $tab_id;
            // prepend with 'tab-' string
        }
    }
    return $tab_id;
}
public function product_save_data( $post_id, $post ) {
    $tab1_title = stripslashes( $_POST['_wc_custom_product_tabs_1_title'] );
    $tab1_content = stripslashes( $_POST['_wc_custom_product_tabs_1_content'] );

    $tab2_title = stripslashes( $_POST['_wc_custom_product_tabs_2_title'] );
    $tab2_content = stripslashes( $_POST['_wc_custom_product_tabs_2_content'] );


    // save the data to the database
    $tab_data['tab1'] = array( 'title' => $tab1_title, 'id' => $this->generate_tabId($tab1_title), 'content' => $tab1_content );
    $tab_data['tab2'] = array( 'title' => $tab2_title, 'id' => $this->generate_tabId($tab2_title), 'content' => $tab2_content );

    update_post_meta( $post_id, 'frs_woo_product_tabs', $tab_data );
}
Sửa lại nội dung các tabs sử dụng với nhiều fields khác nhau.
foreach ( $tab_data as $tab_id=>$tab ) {
    if($tab_id=='tab1'){
        // display the custom tab panel
        echo '<div id="woocommerce_product_tabs_1" class="panel wc-metaboxes-wrapper woocommerce_options_panel">';
        woocommerce_wp_text_input( array( 'id' => '_wc_custom_product_tabs_1_title', 'label' => __( 'Tab Title', self::TEXT_DOMAIN ), 'description' => __( 'Required for tab to be visible', self::TEXT_DOMAIN ), 'value' => $tab['title'] ) );
        $this->woocommerce_wp_textarea_input( array( 'id' => '_wc_custom_product_tabs_1_content', 'label' => __( 'Content', self::TEXT_DOMAIN ), 'placeholder' => __( 'HTML and text to display.', self::TEXT_DOMAIN ), 'value' => $tab['content'], 'style' => 'width:70%;height:21.5em;' ) );
        echo '</div>';
    }
    if($tab_id=='tab2'){
        // display the custom tab panel
        echo '<div id="woocommerce_product_tabs_2" class="panel wc-metaboxes-wrapper woocommerce_options_panel">';
        woocommerce_wp_text_input( array( 'id' => '_wc_custom_product_tabs_2_title', 'label' => __( 'Tab Title', self::TEXT_DOMAIN ), 'description' => __( 'Required for tab to be visible', self::TEXT_DOMAIN ), 'value' => $tab['title'] ) );
        woocommerce_wp_textarea_input( array( 'id' => '_wc_custom_product_tabs_2_content', 'label' => __( 'Content', self::TEXT_DOMAIN ), 'placeholder' => __( 'HTML and text to display.', self::TEXT_DOMAIN ), 'value' => $tab['content'], 'style' => 'width:70%;height:21.5em;' ) );
        echo '</div>';
    }
    ...
}
Cách sử lý khác là lưu tên tab vào trong mảng chứa dữ liệu field.
$tab_data[] = array('tab'=>'tab1', 'title' => $tab1_title, 'id' => $this->generate_tabId($tab1_title), 'content' => $tab1_content );
$tab_data[] = array('tab'=>'tab2', 'title' => $tab2_title, 'id' => $this->generate_tabId($tab2_title), 'content' => $tab2_content );

update_post_meta( $post_id, 'frs_woo_product_tabs', $tab_data );
Lấy fields ra tabs.
foreach ( $tab_data as $tab ) {
    if($tab['tab']=='tab1'){
        // display the custom tab panel
        echo '<div id="woocommerce_product_tabs_1" class="panel wc-metaboxes-wrapper woocommerce_options_panel">';
        woocommerce_wp_text_input( array( 'id' => '_wc_custom_product_tabs_1_title', 'label' => __( 'Tab Title', self::TEXT_DOMAIN ), 'description' => __( 'Required for tab to be visible', self::TEXT_DOMAIN ), 'value' => $tab['title'] ) );
        $this->woocommerce_wp_textarea_input( array( 'id' => '_wc_custom_product_tabs_1_content', 'label' => __( 'Content', self::TEXT_DOMAIN ), 'placeholder' => __( 'HTML and text to display.', self::TEXT_DOMAIN ), 'value' => $tab['content'], 'style' => 'width:70%;height:21.5em;' ) );
        echo '</div>';
    }
    if($tab['tab']=='tab2'){
        // display the custom tab panel
        echo '<div id="woocommerce_product_tabs_2" class="panel wc-metaboxes-wrapper woocommerce_options_panel">';
        woocommerce_wp_text_input( array( 'id' => '_wc_custom_product_tabs_2_title', 'label' => __( 'Tab Title', self::TEXT_DOMAIN ), 'description' => __( 'Required for tab to be visible', self::TEXT_DOMAIN ), 'value' => $tab['title'] ) );
        $this->woocommerce_wp_textarea_input( array( 'id' => '_wc_custom_product_tabs_2_content', 'label' => __( 'Content', self::TEXT_DOMAIN ), 'placeholder' => __( 'HTML and text to display.', self::TEXT_DOMAIN ), 'value' => $tab['content'], 'style' => 'width:70%;height:21.5em;' ) );
        echo '</div>';
    }
    ...
}
Thêm custom tab vào single product tabs

Để thêm tab mới vào danh sách tabs của sản phẩm bao gồm Description, Reviews, Related, chúng ta khai báo thêm dữ liệu tabs vào filter woocommerce_product_tabs. Các Tabs nội dung của sản phẩm sẽ được hiển thị trong trang sản phẩm chi tiết bởi action hook woocommerce_after_single_product_summary. Mặc định có 2 hàm liên kết với hook này, một hàm giúp hiển thị product tabs và hàm thứ hai hiển thị các sản phẩm liên quan. Lời gọi nội dung Tabs chứa trong file content-single-product.php
<?php
    /**
     * woocommerce_after_single_product_summary hook
     *
     * @hooked woocommerce_output_product_data_tabs - 10
     * @hooked woocommerce_output_related_products - 20
     */
    do_action( 'woocommerce_after_single_product_summary' );
?>
Mỗi tab có cấu trúc như sau:
$tabs[ $tab['id'] ] = array(
        'title'    => __( $tab['title'], self::TEXT_DOMAIN ),
        'priority' => 25,
        'callback' => array( $this, 'custom_product_tabs_panel_content' ),
        'content1'  => $tab['content'],  // custom field
    );
Trong đó:
Tiêu đề tab lấy nội dung của thuộc tính “title”, có thể thêm tab vào cuối danh sách tabs hoặc xen giữa ở bất kỳ vị trí nào bởi thuộc tính ‘priority’. Nội dung của tabs thực thi bởi hàm liên kết “callback”.
Thêm đoạn code sau vào file functions.php hoặc tạo plugin mới như dưới đây.
// frontend stuff

add_filter( 'woocommerce_product_tabs',  array($this,'add_custom_product_tabs' )) ;
/**
 * Add the custom product tab
 *
 * $tabs structure:
 * Array(
 *   id => Array(
 *     'title'    => (string) Tab title,
 *     'priority' => (string) Tab priority,
 *     'callback' => (mixed) callback function,
 *   )
 * )
 *
 * @since 1.2.0
 * @param array $tabs array representing the product tabs
 * @return array representing the product tabs
 */
public function add_custom_product_tabs( $tabs ) {
    global $product;

    if ( $this->product_has_custom_tabs( $product ) ) {
        foreach ( $this->tab_data as $tab ) {
            $tabs[ $tab['id'] ] = array(
                'title'    => __( $tab['title'], self::TEXT_DOMAIN ),
                'priority' => 25,
                'callback' => array( $this, 'custom_product_tabs_panel_content' ),
                'content'  => $tab['content'],  // custom field
            );
        }
    }

    return $tabs;
}
Ngoài ra, có thể chứa thêm dữ liệu khác cho nội dung tab vào biến $tabs. Ví dụ trên, dữ liệu content sẽ được khai thác trong hàm custom_product_tabs_panel_content.
/**
 * Render the custom product tab panel content for the given $tab
 *
 * $tab structure:
 * Array(
 *   'title'    => (string) Tab title,
 *   'priority' => (string) Tab priority,
 *   'callback' => (mixed) callback function,
 *   'id'       => (int) tab post identifier,
 *   'content'  => (sring) tab content,
 * )
 *
 * @param string $key tab key
 * @param array $tab tab data
 *
 * @param array $tab the tab
 */
public function custom_product_tabs_panel_content( $key, $tab ) {

    //// allow shortcodes to function
    $content = apply_filters( 'the_content', $tab['content'] );
    $content = str_replace( ']]>', ']]>', $content );

    echo apply_filters( 'woocommerce_custom_product_tabs_lite_heading', '<h2>' . $tab['title'] . '</h2>', $tab );
    echo apply_filters( 'woocommerce_custom_product_tabs_lite_content', $content, $tab );
}
Ở đây mình tạo thêm filter woocommerce_custom_product_tabs_lite_content liên kết với hàm do_shortcode, cho phép thực thi shortcode trong nội dung tab.
Thêm dòng này nếu muốn sử dụng shortcode trong custom product tab ở trên.
// allow the use of shortcodes within the tab content

add_filter( 'woocommerce_custom_product_tabs_lite_content', 'do_shortcode' );
Plugin tạo WooCommerce Tabs
Nếu không rành về code, bạn có thể tạo custom tab dễ dàng với plugin WooCommerce Custom Product Tabs Lite.